Lexakai
Lexakai creates markdown and UML from Java source code


Lexakai 
Lexakai is a command line tool used to create UML diagrams and markdown documentation indexes.
Index
Summary
Screenshots
Project Resources
Setup
Configuring Your Project
Examples
Readme Generation and Updating
Creating Basic UML Package Diagrams
Custom UML Diagrams
Grouping Methods in Class Diagrams
Automatic Method Groups
UML Associations
Excluding Types And Members
Non-Public Apis
Annotation Summary

Summary
The palest ink is better than the best memory.
— Chinese proverb
Lexakai - from lexis (greek for word) and kai (hawaiian for ocean).
Lexakai creates and updates UML diagrams and README.md documentation indexes from the source code of each maven project discovered recursively from the root folder(s) given as argument(s).
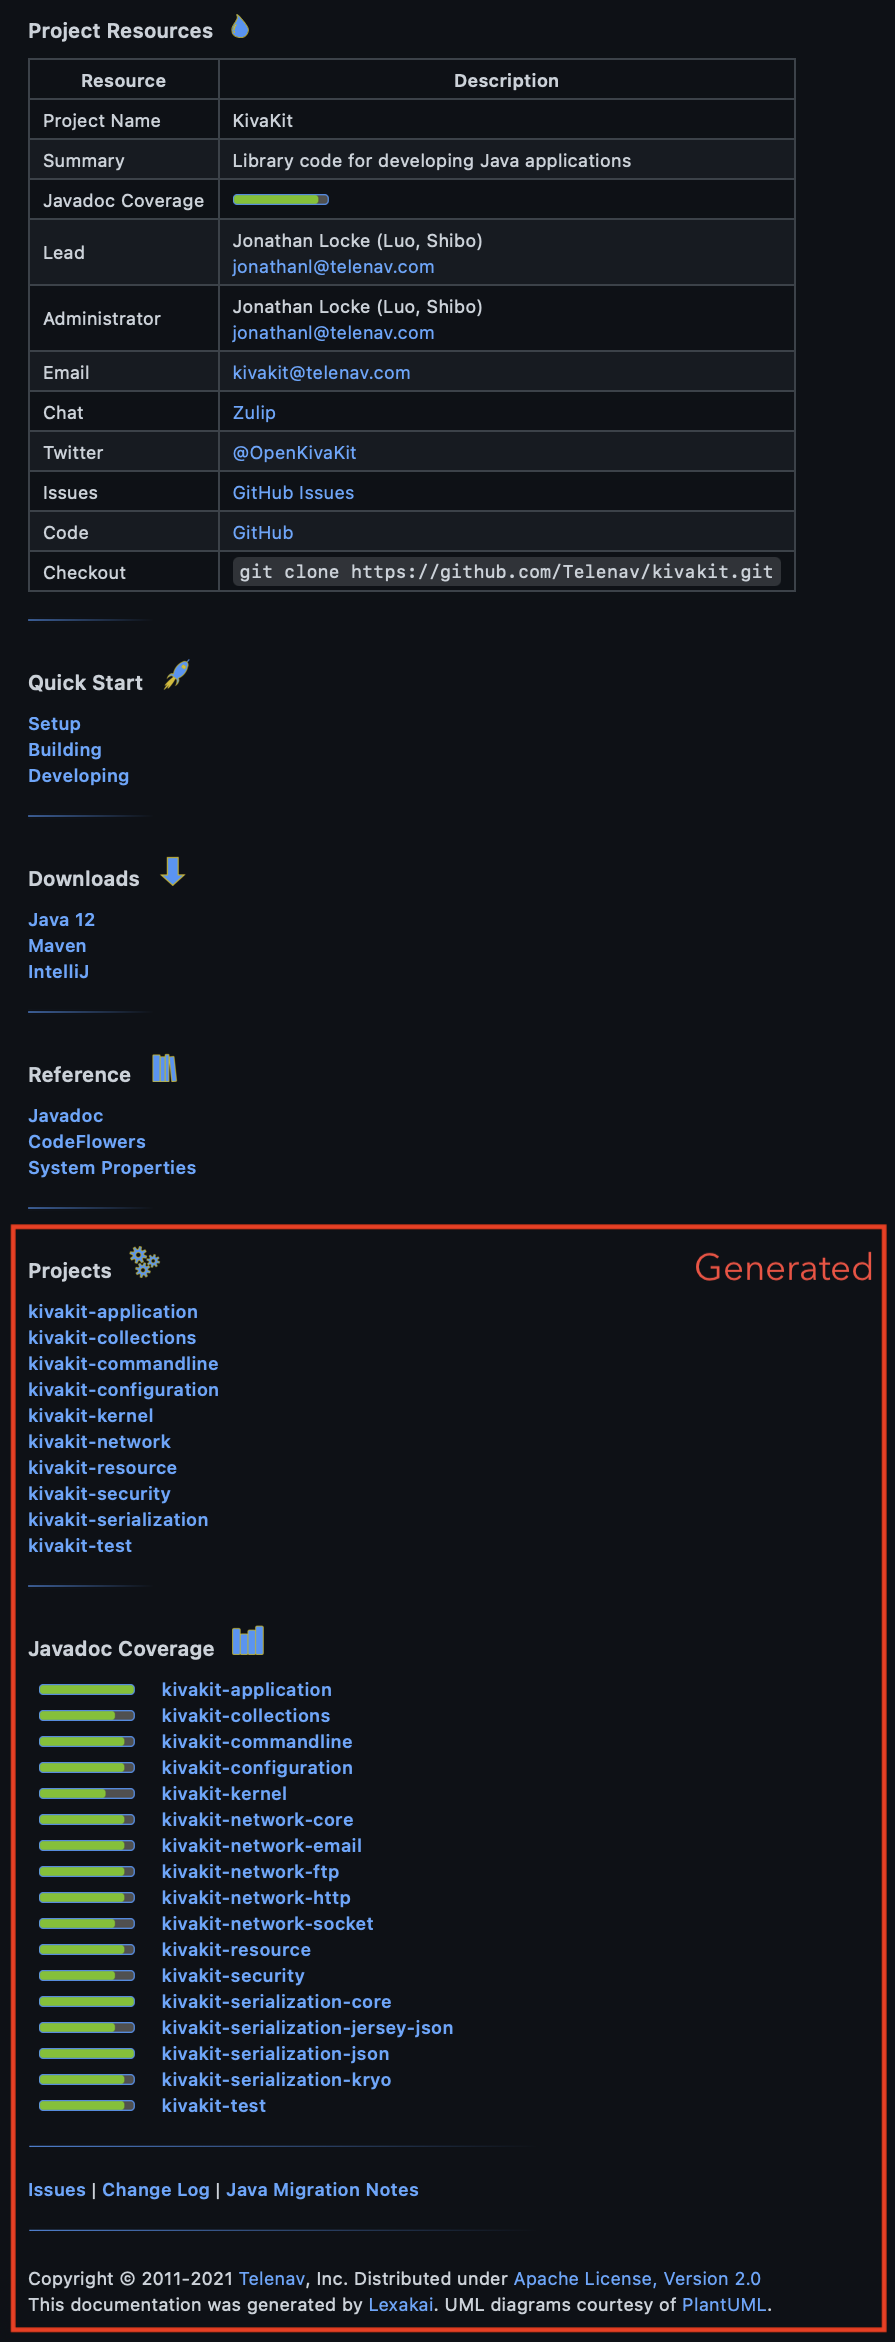
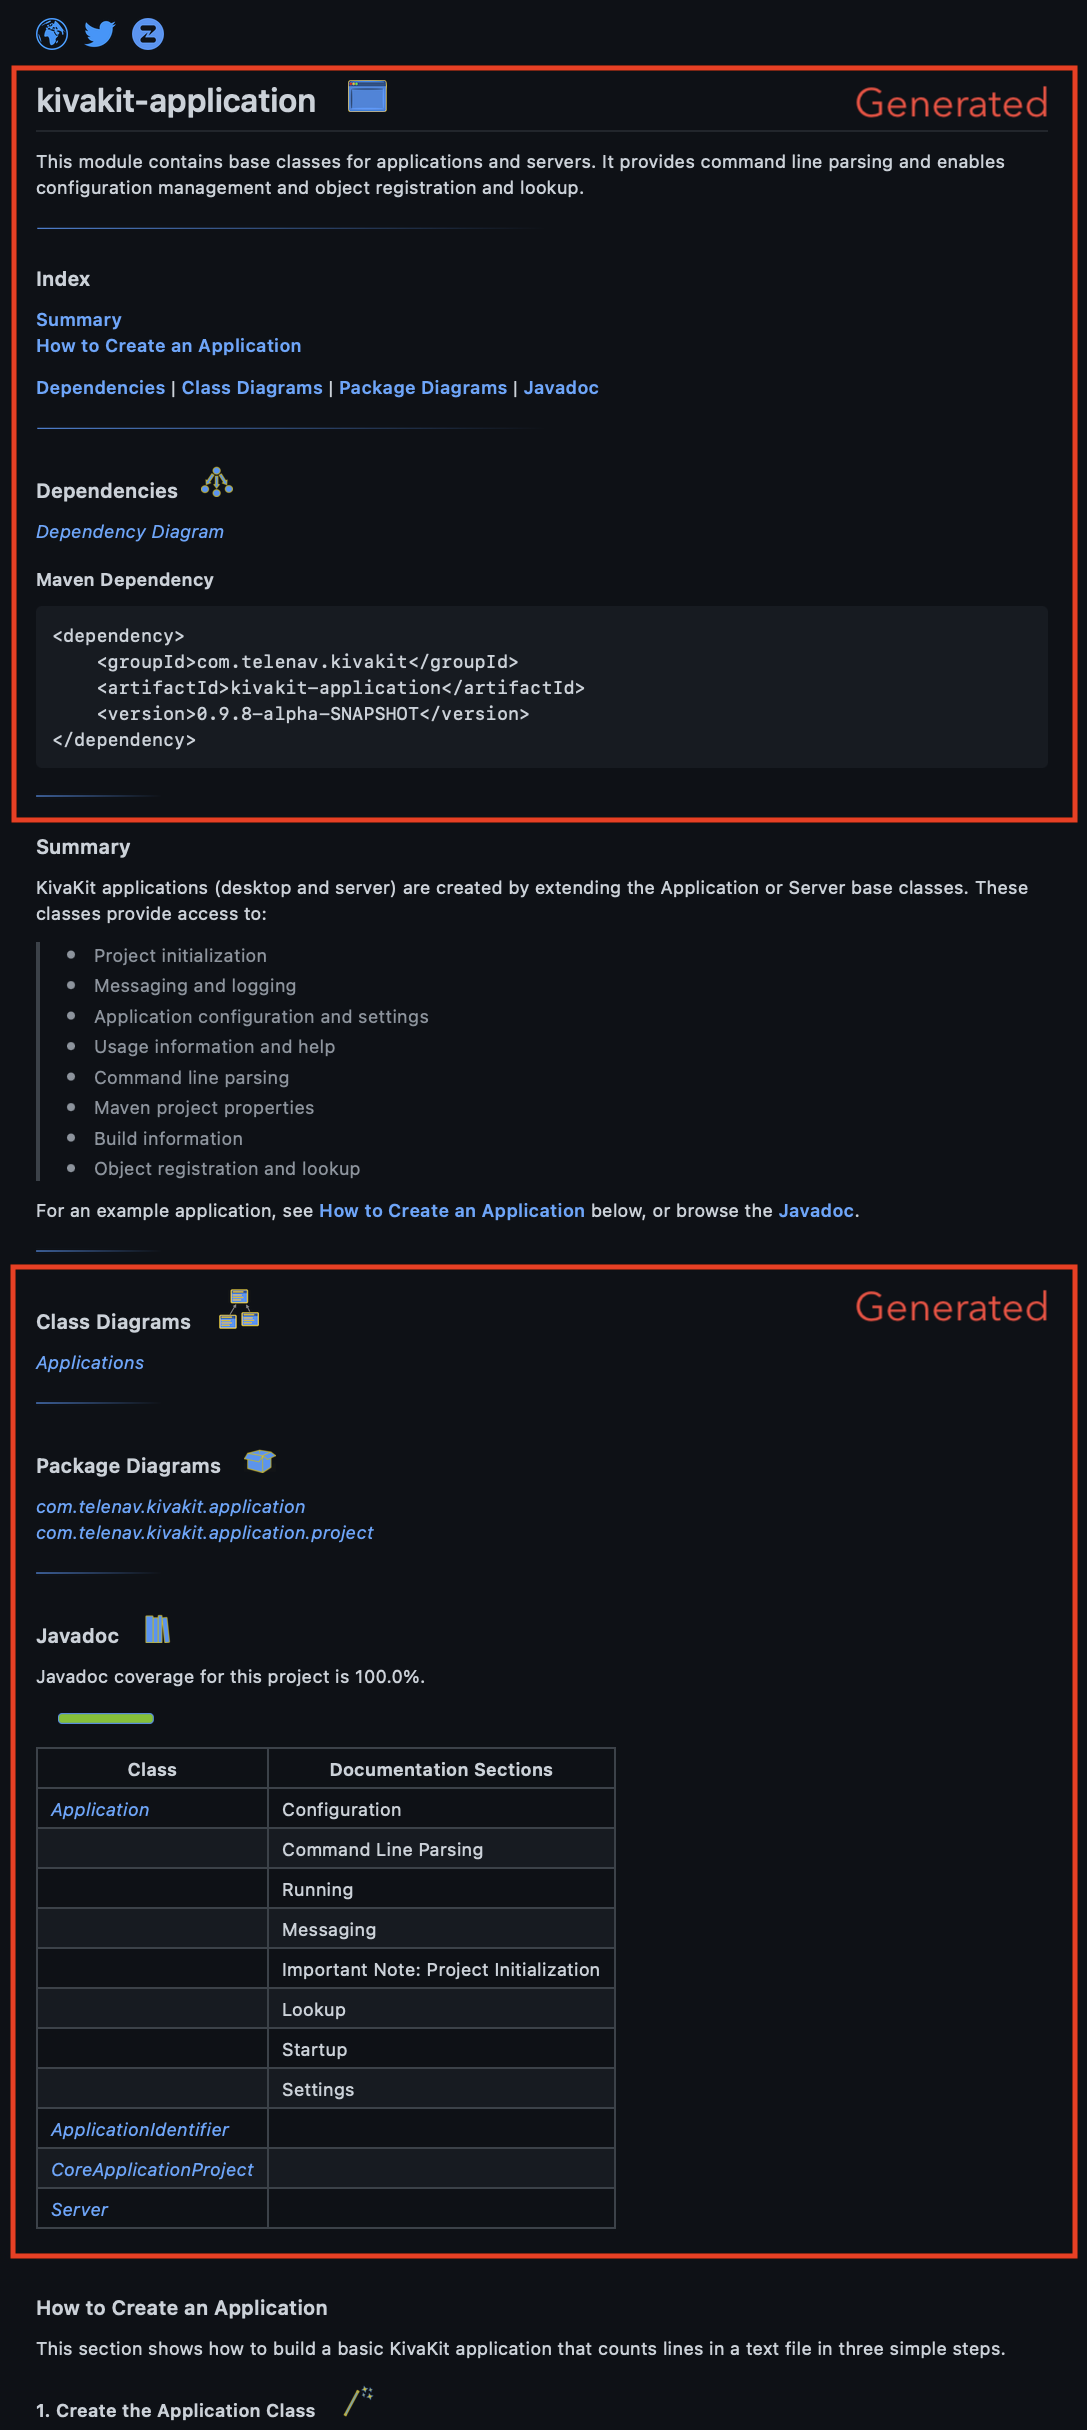
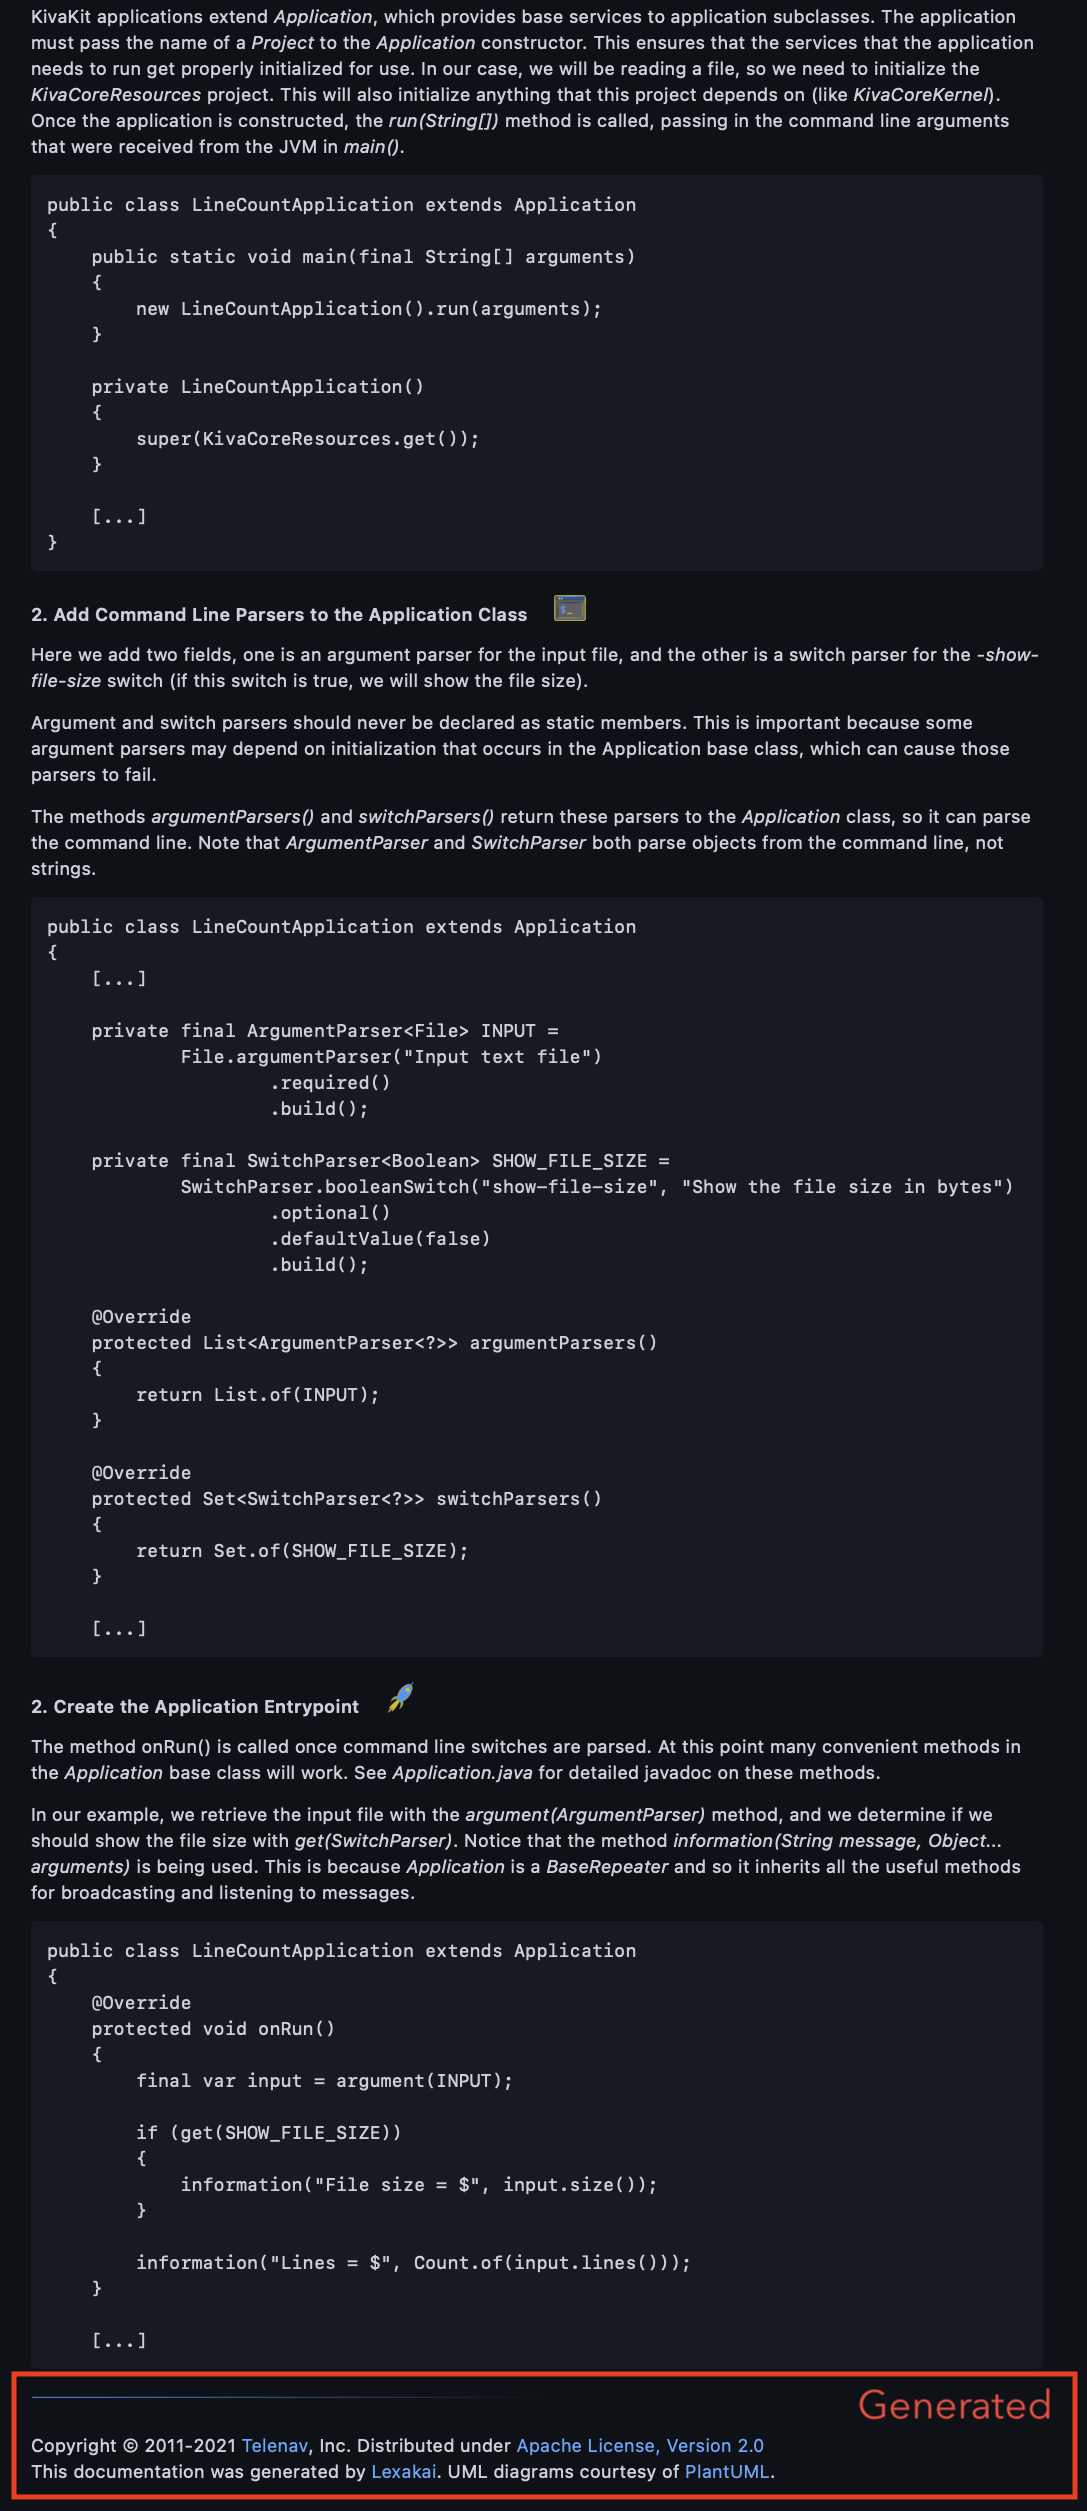
Screenshots
The screenshots below are from the kivakit project (first two images) and the kivakit-application module (second two images). The red boxes show the sections of the markdown that Lexakai generated. Lexakai also generates the UML diagrams and dependency diagrams that are linked to from these sections.
")
Project Resources 
| Resource | Description |
|---|---|
| Project Name | Lexakai |
| Summary | Lexakai creates markdown and UML from Java source code |
| License | Apache License, Version 2.0 |
| Javadoc Coverage |  |
| GitHub | GitHub project home page |
| Code | git clone https://github.com/Telenav/lexakai.git |
| Project Lead | Jonathan Locke (Luo, Shibo) jonathanl@telenav.com |
| Administrator | Jonathan Locke (Luo, Shibo) jonathanl@telenav.com |
| lexakai@telenav.com | |
| Chat | Zulip |
| @OpenLexakai | |
| Issues | GitHub Issues |
Setup 
At this time, Lexakai is limited to Maven projects only.
-
Install Java 11 or later
-
Install GraphViz for generating SVG files
-
Download Lexakai 1.0.20

-
Run Lexakai from your project root with:
java -jar lexakai-application-[version].jar . -
Configure Lexakai for your project as described in the next section
-
See Readme Generation and Updating to begin creating or updating README.md indexes in your projects
Configuring Your Project 
Creating project.properties files
Lexakai requires each project in your source tree to have a project.properties file. For projects with source code, this should be located in src/main/java and for projects with children, it should be located in the project folder itself. This contents of this file should look like this:
project-name = My Project
project-version = 0.9.0-alpha
project-group-id = com.mydomain
project-artifact-id = myproject
These project.properties files can be created and maintained by hand, or they can be generated during the build process with the ant-run plugin.
The Lexakai settings folder
When Lexakai is run for the first time (in step 4, above), it will create a documentation/lexakai folder in the root of your project. This folder will be populated with default settings files similar to this:
+ documentation
\---+ lexakai
    |     lexakai.settings
    |     lexakai.theme
    |     lexakai.groups
    |     lexakai-source-readme-template.md
    |     lexakai-project-readme-template.md
    \---+ projects
              my-project.properties
              my-project-sub-project.properties
where the files in this tree are described as follows:
| Settings File | Description |
|---|---|
| lexakai.settings | Global settings for all projects |
| lexakai.theme | PlantUML theme file |
| lexakai.groups | Patterns used to automatically group methods |
| lexakai-source-readme-template.md | README.md template for projects that have source code |
| lexakai-project-readme-template.md | README.md template for projects that have child projects |
| projects/[project-artifact-id].properties | Settings for each project in the source tree |
The .theme, .groups and README.md template files can be customized but don’t need to be. To perform a ‘factory-reset’ on these resources, run Lexakai with -overwrite-resources=true or simply remove the files and Lexakai will re-create them.
The lexakai.settings file
The Lexakai global settings file contains the following properties:
#
# Locations of resources linked to from README.md files
#
lexakai-documentation-location = https://www.mydomain.org/lexakai
lexakai-javadoc-location = https://www.mydomain.org/javadoc
lexakai-images-location = https://www.mydomain.org/images
project-footer = <sub>Copyright © 2011-2021, Me</sub>
These values specify the location of resources for Lexakai when it is creating or updating links in README.md files, as well as the footer text to use for each file.
When using GitHub Pages, the folders lexakai, javadoc and images are normally in the docs folder and GitHub Pages is configured to share that folder with the world. Your domain should be mapped to the appropriate github.io subdomain, like mydomain.github.io so that the https resource roots in lexakai.settings resolve to the files in docs/lexakai, docs/javadoc and docs/images. In your docs folder, the CNAME file should also contain the name of your domain, like:
www.mydomain.org
See the GitHub documentation for more information on how to use GitHub Pages.
The projects folder
Each project in the source tree requires a [project].properties file in the projects folder, which looks like:
#
# Project
#

project-title            = kivakit-core-network-core
project-description      = This module provides networking functionality.
project-icon             = nucleus-32

#
# Diagrams
#

diagram-port             = Hosts, Ports and Protocols
diagram-network-location = Network Locations
The project-title, project-description and project-icon values will be used to populate values in the README.md templates (described above). The project-icon value is used as the base name of [project-icon].png and [project-icon]-2x.png, in order to support HiDPI displays. The diagrams section provides titles for individual UML diagrams. The lowercase, hyphenated name of the marker interface (as described above) is used as a key to locate the title of the diagram. For example:
@UmlClassDiagram(diagram = DiagramMyUtilities.class)
refers to the diagram title specified by the key diagram-my-utilities in the .properties file for the project.
Examples
Examples of Lexakai documentation:

Readme Generation and Updating 
If the -update-readme switch is set to true (it is false by default to ensure it doesn’t overwrite an existing file), then a README.md file will be generated or updated each time the UML diagrams are generated. This markdown file will use project-title as its title and insert the description project-description from the [project].properties file as the project description.
An index of project diagrams is updated along with an index of the Javadoc (which should be available at lexakai-javadoc-location) for all types. Sections of documentation in the Javadoc can also be indexed based on the pattern specified by the switch -javadoc-section-pattern. By default, this pattern is:
<p><b>section-title</b></p>
which is the style used in KivaKit, but any regular expression pattern can be substituted.
Preserving Text Between Updates
Any text between the markdown comments start-user-text and end-user-text will be preserved, allowing additional documentation to be maintained.
Custom README Templates
The first run of Lexakai on a project will create two default templates in the * documentation/lexakai* settings folder one for projects with source code and one for parent projects (projects with sub-projects). These template files can be modified to produce custom output. To revert to the default templates, simply remove them and run Lexakai again.
Creating Basic UML Package Diagrams 
Lexakai automatically creates basic package diagrams for all public types without further configuration.
Custom UML Diagrams 
To create a set of one or more custom diagrams for a project, annotations can be used from this project:
<dependency>
    <groupId>com.telenav.lexakai</groupId>
    <artifactId>lexakai-annotations</artifactId>
    <version>1.0.10</version>
</dependency>
A class, annotation, enum or interface annotated with @UmlClassDiagram(diagram = [marker-interface] .class), where [marker-interface] extends the interface UmlDiagramIdentifier, will be included in the specified diagram.
For example, a type annotated with:
@UmlClassDiagram(diagram = DiagramMapServer.class)
will be included in the diagram diagram-map-server (the lowercase, hyphenated name derived from the marker interface name). A type can be used in more than one diagram, by specifying more than one @UmlClassDiagram annotation:
@UmlClassDiagram(diagram = DiagramMapServer.class)
@UmlClassDiagram(diagram = DiagramServers.class)
The preferred location for diagram marker interfaces is in the sub-package * project.lexakai.diagrams, and they should be prefixed with * Diagram to make their use clear.
Grouping Methods in Class Diagrams 
Groups of methods can be specified using the @UmlMethodGroup annotation. Method groups will be given labeled separators in class diagrams, making the list of methods easier to understand.
For example:
@UmlMethodGroup("settings")
could be used to label all the settings-related methods in a type. Multiple @UmlMethodGroup annotations can be added to specify that a method should be shown in more than one group.
Automatic Method Groups 
The @UmlMethodGroup annotation can be avoided if the switch -automatic-method-groups is set to * true* (which is the default). In this case, the best guess will be made based on method name and parameter patterns as to which group a method most likely belongs. When the guess is inaccurate, or no guess is made, an @UmlMethodGroup annotation can be applied to correct the result. The set of patterns that are used to determine automatic groups is in a file called lexakai.groups in the Lexakai settings folder. This file can be customized for a particular project. An explicit annotation can be used to override any automatic group assignment(s) for a method.
UML Associations 
Patterns in the names of types, fields and methods are used to try to deduce UML associations. The annotation @UmlRelation can be used to override this guess with an explicit relation if the association was not be deduced, or it was deduced incorrectly.
If the annotation @UmlRelation(label = "label") is applied to a method or field, a relation arrow will be drawn from the enclosing type to the type of the member. Similar annotations are available for field aggregation (@UmlAggregation) and composition (* @UmlComposition). If the *@UmlRelation tag is applied to a type, it can specify a relation with a particular referent and cardinality. An explicit relation of this type can be made specific to a particular diagram with the diagram parameter. Multiple @UmlRelation tags can be applied to a type.
Excluding Types And Members 
Methods and fields can be excluded entirely by labeling them with @UmlExcludeMember.
Non-Public Apis
@UmlNotPublicApi marks a type or member as private even if it is not actually private.
Annotation Summary 
Diagrams
- @UmlClassDiagram - declares the diagram(s) that the annotated type should be included in
- @UmlMethodGroup - includes the annotated method in a labeled method group in the diagram
- @UmlNote - adds a callout note to a type or method
Visibility
- @UmlExcludeSuperTypes - excludes the listed supertypes from all diagrams
- @UmlExcludeMember - excludes the annotated member
- @UmlIncludeMember - includes the annotated member, even if it wouldn’t normally be included
- @UmlNotPublicApi - marks the annotated type or member as private even if it is not
Associations
- @UmlRelation - adds a labeled UML relation from the enclosing type to the annotated member type
- @UmlAggregation - adds a UML aggregation association from the enclosing type to the annotated field type
- @UmlComposition - adds a UML composition association from the enclosing type to the annotated field type

© 2011-2021 Telenav, Inc. Licensed under Apache License, Version 2.0.
This documentation was generated by Lexakai on 2021.04.02. UML diagrams courtesy of
PlantUML.